How to Make a Dynamic Data Validation Drop-Down List in Excel

Are you fed up with having to continually add new data to your data validation drop-down lists? Are you also fed up with having to modify the source data to extend the list manually each time new data has been entered? In this blog, Edmund, one of our Office experts, will show you how to make dynamic data validation drop-down lists and extend the lists automatically when new data is entered.

Hi, we are Happy

We are leading a movement to create happy, empowered and productive workplaces.

How can we help you and your people to find joy in at least 80% of your work?

Keep informed about happy workplaces

Sign up to Henry's monthly Happy Manifesto newsletter, full of tips and inspiration to help you to create a happy, engaged workplace.

Step 1: Create an Excel Table (Format as Table) for the source data list

To create a dynamic data validation drop-down list, you need to create an Excel Table first, and then apply the Data Validation feature.

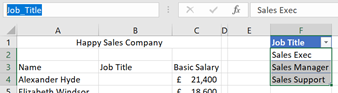
Create the list you want to use as the source data for the drop-down list. In this example, we’ve created a list of Job Titles in Column F.

Creating an Excel Table

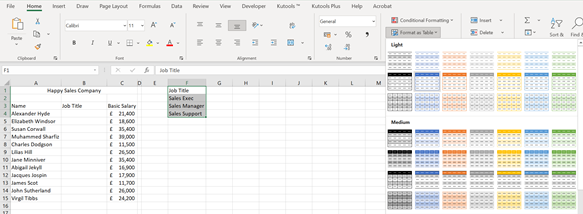
Select the data list (Cell reference from F1 to F4) and click the “Format As Table” icon from the Home tab.

Next, choose your choice of colour from the list.

If your data list has headers (such as Job Title), go to the Create Table dialog box and apply the checkbox where that says My table has headers.

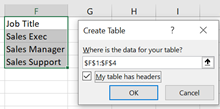
Click the OK button and the table has now been created.

Step 2: Define a range name for the Excel Table

Select the data table you have created, except for the header (e.g. F1: Job Title), and type a name for this table in the Name box, such as Job_Title. Excel doesn’t allow spaces and most punctuation characters between words hence the spaces are replaced with underscores.

Press the Enter (Return) key to record the new name, otherwise the name you have typed will return its cell reference.

Note: Don’t worry if once you have entered the name in the Name box, it goes back to the same name as before e.g. Table1. It has been recorded with a new name as long as you pressed the Enter (Return) key after typing the new name.

Step 3: Create a dynamic data validation list

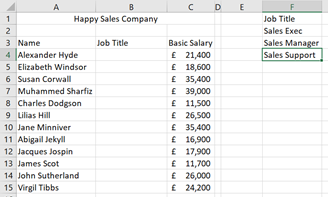
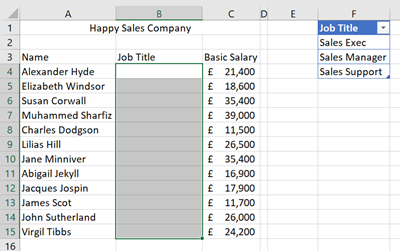
After defining the name for the data table, select the cells in which you want the drop-down lists to appear, e.g. from B4 to B15:

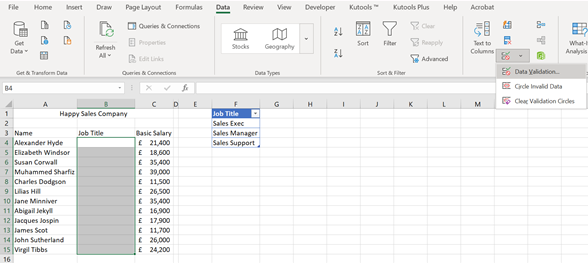
Select Data Validation under the group name Data Tools from the Data tab:

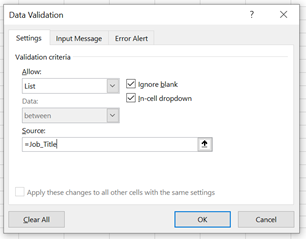
In the Data Validation dialog box, under the Settings tab, select List from the Allow section and enter this formula: =Job_Title (Job_Title is the name you created for the data table in step 2) into the Source text box. Click the OK button.

Step 5: You’re done!

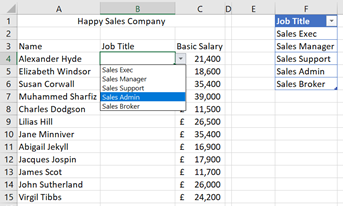
The drop-down list has been created and should appear in the selected cells (Cell reference from B4 to B15). 

When you add new data to the source list, such as Sales Admin and Sales Broker in Cell Reference F5 and F6 respectively, it will automatically be added to the drop-down list:

Learn the 10 core principles to create a happy and productive workplace in Henry Stewart's book, The Happy Manifesto.

Hi, we are Happy

We help organisations create happy, productive workplaces, where people feel trusted, work to their strengths and are confident with their IT software.

We want everyone to find joy in at least 80% of their work, everyday.

Our workplace solutions include:
– Workplace consultancy
– Leadership and personal development programmes
– Government-funded management apprenticeships
– AI and Excel training

And much more. Get in touch with our friendly team to discuss your current challenge and find out how we can help you.

Ed Lepre

Ed is a Microsoft Certified Trainer (MCT) and has worked at Happy for over 12 years. Although he trains the full suite of MS Office and non-Office packages at all levels, his favourite package is Excel. A previous winner of the prestigious Learning and Performance Institute’s ‘Learning Professional of the Year’ award, as well as other training accolades, he is also the IT Helpline Manager.

What you should look at next

Want more ideas for creating happy, productive workplaces?

Sign up for our Happy Manifesto newsletter and discover fresh ways to ignite joy and productivity at work. Get expert tips, insights, and ideas that challenge the norm—straight to your inbox. Join our movement and start your journey for a trust-based, values-led organisation.